In part 1 and part2 of this almost unbearably exciting series, I outlined the concept of distributing purely functional programs and went through some implementation details of Girder.
So far, however, I've only asserted that it works, so today I want to start explaining how I used Amazon Web Services to test pretty cheaply on gobs of machines.
The art of AWS wrangling was somewhat new to me, and I went through a few iterations before deciding on the right mix of tools. Needless to say, the right mix ended up being fairly Clojure heavy, which helps to smooth out the lack of a true asynchronous interface to AWS.
Warnings and Confessions
- This post isn't really about distributed functional programming at all, so if you know all about AWS, bounce at will.
- Moreover, tag notwithstanding, there won't be any Clojure code in today's chapter, but the setup will be necessary for Clojure code in the next chapter.
- I had to remove a bunch of snarky comments about how the cool kids eschew Amazon's web interface in favor of the command line, because, the way the post had evolved, I was no longer a cool kid. Seriously, I did in fact replicate everything using the CLI, but, except for bragging rights and general geek calisthenics, the exercise was not useful. A big list of the commands that I used would be both opaque and brittle, of little use to you if something went wrong or if you wanted to do anything slightly different.
The world of Amazon Web Services
AWS comprises a vast set of services. The ones I've used generally sharing the following qualities.
- Reliability
- Reasonable price
- Enormous feature set
- Idiosyncratic API choices, compounded by
- Unforgivably scattered documentation.
My guess is that if you use their more fully vertical solutions, like Workspaces or even Elastic Beanstalk, the user experience is a bit more uplifting, but the wrestling with the general problem of "running stuff on a bunch of linux boxes" may be the single greatest risk factor for bruxism.
General approach
I want to minimize interaction with the AWS management console, and, to the greatest extent possible, I even want to avoid ssh-ing onto machines. So the basic strategy, not all of which we'll get through today, is as follows:
- Set up all the access security, network isolation, etc. on AWS.
- Bring up a linux instance, install a bunch of packages, do some sysadminy stuff and set up a mechanism for later making it do other things without logging in.
- Bring it down and take a "snapshot," which we'll later be able to use as a template.
- Write a bunch of Clojure tools to automate the process of bidding on, bringing up and shutting down instances, dealing with at least the most commonly encountered non-determinism.
- Write a general CLI application in Clojure to make it easy to slap together specific CLI applications for running particular services.
- Create uberjars for these applications and upload them to S3, whence they can be downloaded cheaply and quickly onto running instances.
- Do some light scripting around my tools to instantiate a flotilla of appropriate instances and run the tests.
- Giggle with delight as 100 real world computers in Virginia do nonsense on our behalf.
- Quickly shut them all down before it gets expensive.
Really basic set-up
Once you set up an account, your starting point for further fun will be from this mind-boggling list of services When I refer to various control panels below, you'll get to them from this last link.
Assuming you just set up your AWS account, you'll want to start by creating an
administrative user account, from their Identity and Access Management, or
IAM panel. It's more or less self-explanatory,
and when creating a user you have an easy option to give it full administrative privileges.
You'll be presented with a set of "credentials" that you are warned not to lose.
I like to keep them in encfs mounts, with
root directories in Dropbox, but that's up to you. Create two files, with extensions,
respectively sh and clj:
export AWS_ACCESS_KEY_ID="THISISMYACCESSKEY"
export AWS_SECRET_KEY="THISISMYSECRETKEYITSABITLONGER"
export AWS_SECRET_ACCESS_KEY=${AWS_SECRET_KEY}
export AWS_DEFAULT_REGION="us-east-1"
and
{:access-key "THISISMYACCESSKEY"
 :secret-key "THISISMYSECRETKEYITSABITLONGER"
 :endpoint   "us-east-1"}
(Those are my actual credentials. Go ahead, give them a try.) There are various places where you can choose a region - there's no great reason for choosing the same one I did.
Setting up billing alarms
Seriously. It's possible to run up huge bills without trying very hard. Go to Billing and Cost Management, in the dropdown under your name. You'll be led by the nose to set up an alarm that goes off when your total bill for the month exceeds some amount. Set up a few more, at varying levels. I have them ranging from 1 to 100 USD.
The alarms will be described with use of the phrase, "for 6 hours." That does not mean you're monitoring charges that accrued over the last 6 hours; it means that your charges remained above the alarm level for that long. Obviously that bit of configuration is more useful for signal value that do not increase monotonically. As far as I can tell, there is no way to get an alarm based on accrued charges over a rolling window - only total charges for the billing month.
You'll also want to set up detailed cost reporting, which is helpful when trying to figure out why your bill is so high. From billing preferences, tick Receive Billing Reports, open the "sample policy" link and copy its JSON contents. In a different tab, go to the S3 console and create a unique bucket. Click Edit Bucket Policy and paste in the sample policy, then Save. Back on the billing page, the Verify button should reward you with a green check mark. Turn on all the reports.
Remember to check these reports reasonably often and to delete the old ones, so that you don't fill up S3 with reports about how much it's costing you to keep reports there.
You can also glean a lot from the bill details link. One surprise will likely be charges in a category called EBS Storage, unless you follow a particular instruction below.
Setting up a less privileged user
Then go ahead and create a second user, and opt for read-only access for it, and store its credentials similarly.
Also make a note of its "user ARN," which will be something like arn:aws:iam::1234567:user/name-you-chose.
Create another S3 bucket
We'll be uploading uberjars to S3, and then downloading from S3 to running instances. That will be much faster
and cheaper than scping to every instance individually,
and it mens that we don't have to make every instance accessible to the internet. So, select the S3 service
and create a new bucket with a name you like.
Setting up notification services
We're going to want to use the Simple Notification Service to allow EC2 instances to alert us to important information in an application independent fashion. We're also going to use the Simple Queue Service to receive this information. Setting up permissions properly is a non-obvious two-step dance, so proceed as follows:
- From the AWS services list, select SNS and create a new topic, with a name like "instance-status". Accept default options, and ignore the suggestion to create a subscription, but make a note of the topic ARN.
- From the AWS services list, select SQS and create a new queue, with a similar name. Again, accept default options, and ignore the suggestion to create a subscription, but make a note of the queue ARN and the queue URL (which are similar).
- Go back to SNS and create a subscription for your topic of type SQS, entering the queue ARN.
- Go back to SQS, find the permissions tab for your queue and click "add permission"
- Inexplicably, tick the "Everybody box" for principal.
- From the drop-down, select Publish
- Click "Add Conditions (optional)"
- From dropdowns, select Qualifier=None, Condition=StringEquals, Key=aws:SourceArn, and for Value,
enter the SNS topic ARN.
The permissions tab for the queue will look like this:

- Go back to the IAM panel and select the non-privileged user.
- Click "Attach User Policy"
- Select "Policy Generator"
- Set Effect=Allow, Service=SNS, Actions=Publish, and enter the SNS topic ARN.
- Examine the policy you just created. It will have a name beginning with
policygen-and look something like this:
{
  "Version": "2012-10-17",
  "Statement": [
    {
      "Sid": "Stmt123456789",
      "Effect": "Allow",
      "Action": [
        "sns:Publish"
      ],
      "Resource": [
        "arn:aws:sns:us-east-1:123456789:instance-up"
      ]
    }
  ]
}
So, we've created a topic and a queue, subscribed the queue to the topic, set the queue to allow anybody to enqueue, as long as its from that topic, then allowed only one user to publish to that topic. As far as I can tell, there isn't a simpler way.
Two keys pairs.
From EC2, select Key Pairs. First, Import the id_rsa.pub of an account from
which you will want to connect externally.
Second Create Key Pair and choose a nice name, like "boffo". Keep track of the boffo.pem
file, which will download as you create the pair. This is the key that we will use to communicate
between instances.
Creating a template instance
We're going to create a disk image containing linux, with a bunch of software installed, and some custom configuration. Subsequently, we can bring up as many instances as we like, all starting from the same image.
From the web console, go to EC2 and click the blue Launch Instance button. They give you a choice of linuxes, but in my experience everything is best maintained on their custom Amazon version, so I tend to choose that. (Every time you do a web search for some obscure error and discover that it's been experienced by dozens of AWS Ubuntu users since they updated their distribution yesterday, you happily become slightly more sheep-like.) It's the first option. Continue along the wizard, choosing your VPC, the public subnet thereof, your security group, the read-only IAM you set up earlier. Choose shutdown behavior to be "Stop," because you'll want to be able to play around with this machine later.
Keep clicking the right-most progress button (i.e. not "Review and Launch") until you get to the security group page, at which point choose the one you just created. Click Launch, and select the key pair you uploaded (not the one you created). Then follow the link to View Instances, and watch the progress spinner.
Eventually a Public IP will show up on the lower pane, at which point you should be able to ssh to ec2-user at it (assuming you chose the proper key pair).
Before you forget, upload that new .pem file:
scp boffo.pem ec2-user@ec2-user@ec1-54-164-127-5.compute-1.amazonaws.com: # or whatever
ssh ec2-user@ec2-user@ec1-54-164-127-5.compute-1.amazonaws.com
Now install everything you might like to have around.
This definitely includes Redis, since Girder needs it, but it's also handy
to have the Clojure development stack around (although I won't be making use
of it in these posts).
You might choose something
other than emacs, but I do recommend keeping my other choices.
You'll get OpenJDK by default, which is good enough for me; getting Oracle's
version onto AWS would involve more work.
sudo yum -y update
sudo yum -y install git-core emacs strace
wget https://raw.githubusercontent.com/technomancy/leiningen/stable/bin/lein
chmod +x lein
mkdir bin
./lein
mv lein bin/
wget http://download.redis.io/releases/redis-2.8.14.tar.gz
zcat redis-2.8.14.tar.gz | tar xf 0
cd redis-2.8.14
make
cd ~/bin
ln -s ~/redis-2.8.12/src/redis-server
ln -s ~/redis-2.8.12/src/redis-cli
Edit .bashrc to put ${HOME}/bin in the path.
Download this handy utility to extract metadata (like internal and external IP addresses, instance id names, etc.) in an almost parseable form:
wget http://s3.amazonaws.com/ec2metadata/ec2-metadata
chmod +x ec2-metadata
mv ec2-metadata ~/bin
Allowing specification at launch time of user-space commands to be run by an instance
Now we're going to do some really non-standard things. First, create an
executable script in the home directory called robot.sh:
     #!/bin/sh
     set -uo pipefail
     cd $HOME
     date > $HOME/ROBODATE
     (curl -f http://169.254.169.254/latest/user-data | sh -v) >& $HOME/ROBOSCRIPT
That magic URL is, cross my heart, the official way to get access to "user data" specified when an instance is launched. It's inaccessible from outside AWS, and of course it generally ddisgorges different information on different instances within AWS. We'll talk about populating this user data more next time, as it's not possible to do so (pre-launch anyway) from the web interface.
As root create /etc/init.d/userdatarobot, also executable, containing:
    #! /bin/sh
    ###
    # chkconfig: 235 98 55
    # description: Manages the services you are controlling with the chkconfig command
    ###
    . /etc/init.d/functions
    USER=ec2-user
    DIR=/home/${USER}
    CMD=${DIR}/robot.sh
    PIDFILE=${DIR}/ROBOPID
    case "$1" in
      start)
            echo -n "Starting ${CMD} as ${USER}"
            daemon --user=${USER} --pidfile=${PIDFILE} ${CMD} &>/dev/null &
            echo "."
            ;;
      stop)
            echo -n "Stopping ${CMD}"
            killproc -p ${PIDFILE} ${CMD}
            echo "."
            ;;
      *)
            echo "Usage: /sbin/service userdatarobot {start|stop}"
            exit 1
    esac
    exit 0
and /sbin/chkconfig --add userdatarobot. The robot.sh script will now run, as ec2-user when
the machine boots.
Testing out the instance
On the EC2 machine, run aws configure, entering the credentials and region for the non-privileged user you created,
not those of the privileged user.
On your home machine,
pip install awscli
Then run aws configure. This will, among other things, ask for your credentials and then put them
in the directory ${HOME}/.aws, which it creates. I'd recommend moving this directory into the ``encfs'd
mount, since otherwise it's yet another place for your plain-text credentials to be found.
If all works correctly, you should be able to this on the EC2 instance:
aws --region us-east-1 sns publish --topic-arn arn:aws:sns:us-east-1:yourtopic --message yowsa
And this back home:
aws sqs receive-message --queue-url https://sqs.us-east-1.amazonaws.com/your-queue-url --wait-time-seconds 20
You'll get back a majestic blob of JSON, in which "yowsa" is discreetly buried somewhere.
As noted, we'll check out the roboscript business next time.
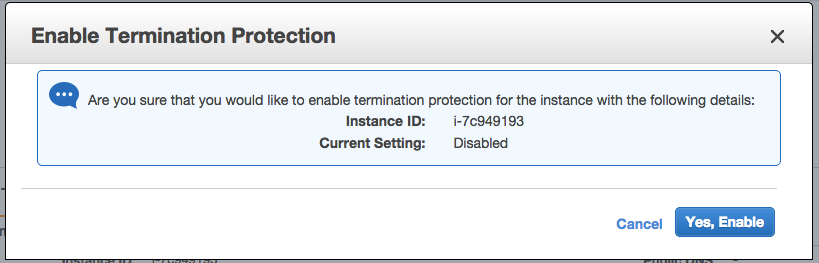
Now log out, and, under Actions, stop (DON'T TERMINATE!) the instance. When it's stopped, again under Actions, enable Termination Protection, so you will be harder to terminate by mistake:
Next, under Actions, Create Image, and accept all the default options
give you another magic keyword ami-something to remember.
Creating a Virtual Private Cloud
We're going to want a whole lot of machines that can chat without too much fuss, but
we don't want them to be easily accessible from the outside world. Typically, we'll
launch one or two machines to which we want to be able to ssh, and then a whole bunch more that
can only be reached from within the VPC.
The whole thing will look like this:

There's one VPC, with two subnets: one public, and accessible from without via a gateway; one
private, with access to the outside world via NAT. (Annoyingly, aws commands require
access to the outside world, so you really do need the NAT. The magic user-data
URL, which is not in the private subnet address space, shows that this shouldn't have to be so, but it is.)
From the VPC Dashboard, click the embarrassing blue Start VPC Wizard button. Choose the second configuration, with two subnets.
Keep the IP CIDR block of 10.0.0.0/16 and /24 for the subnets. That gives you
251 possible IP addresses in each subnet, of the 65k you have available altogether, so you'll
be able to create more subnets in the future if you like.
For both subnets, change the availability zone from no-preference to a specific one. (us-east-1a
is usually cheapest, for some reason.)
Later, we might create new subnets for different availability zones,
but we don't want them to choose for us at this point.
Keep all other defaults and press "Create VPC". You'll notice that it creates and then launches an instance to run the NAT. Head to the EC2 dashboard to STOP it now, so we don't have to pay for it to be up while continuing our configuration. Note: don't TERMINATE, as that will make it disappear forever. In fact, set up termination protection for it too.
Now we need to make some changes. Go to "Your VPCs", and start by giving your new VPC a name.
Then go to "Security Groups". Find the one that's associated with the VPC you just created and
give it a name. Click "Inbound Rules" tab for this security group, and then Edit. Add a new rule,
for port 22, with source 0.0.0.0/0, i.e. anywhere. If you don't do this, you'll never be
able to get to instances even in your publicly accessible subnet. Leave Outbound Rules alone.
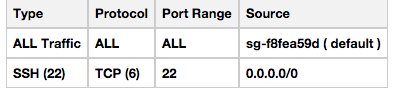
The inbound rule should show that all traffic is allowed from within the security group, but only
SSH is allowed from everywhere else:
Go to Subnets. You'll see subnets named Public and Private (unless you overrode them in the Wizard), both associated with the new VPC. For each successively, click Modify Auto-Assign Public IP, and make sure it's turned on for the public subnet
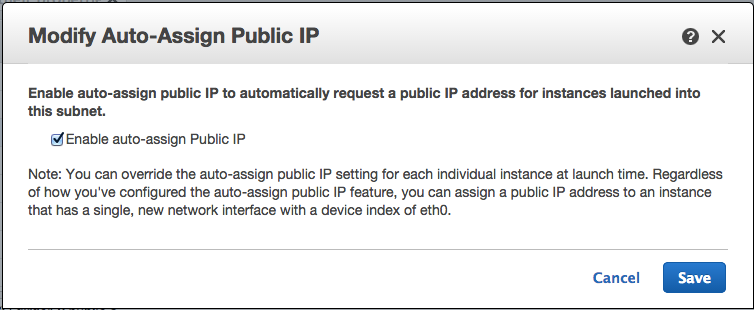
and off for the private subnet. It will be wrong for at least one of them.
Testing out the VPC
Go to the EC2 console and the AMIs page. Select the AMI you saved earlier and Launch it. Then
- Select a
t1.microinstance, and then "Next: Configuration Details" (not "Review and Launch"). - Tick "Request Spot Instances" and enter something like 0.01 as maximum price per hour. You won't actually pay this, but if the spot price should float above it, your request will be denied.
- Under the Network dropdown, select your new VPC, then under Subnet, the public one.
- For IAM rule, select the unprivileged users.
- Click "Add Storage" (but don't add any), then "Tag Instance" (entering a name if you want), then "Configure Security Group".
- Choose "Select an existing security group". You'll should only see one group listed, but if there for some reason are more, choose the one associated with your VPC. Then "Review and Launch".
- You'll see a warning about your instance being open to the world. It isn't really, only port 22, so ignore it. Finally launch. You'll be given a list of key pairs; select the home key you uploaded.
You'll be directed to the Spot Request screen, where you'll see your request as "open", "pending fulfillment".
Now repeat the whole process for a second instance,
except choose the private subnet and the boffo key you created.
The warning will be even more irrelevant, because this
instance won't even have a public IP address.
Finally, on the EC2 Instances page, Actions->Start up the NAT. (Not the Launch button, that starts from scratch.)
Now keep clicking back and forth between Instances and Spot Requests, until you see that all three instances (NAT, public, private) are running. There's a small chance that the spot requests will fail with an obscure error about insufficient capacity, even though the spot price never exceeded your maximum. In that case try again.
At this point, you should be able to ssh to the public instance, at the address shown on the Instances page.
From the public instance, issue the aws sns command you tried earlier, and then from home, the aws receive-message
command. Hopefully that works.
Now, on the public instance, verify that you can ssh -i boffo.pem to the private instance.
From the private instance, issue the aws sns command you tried earlier, and then from home, the aws receive-message
command. This time, the AWS command is being transmitted to Amazon via the NAT.
You might also look at the contents of ROBODATE and ROBOSCRIPT. The latter should show an error from curl, because
there wasn't any user data specified.
You might also verify that it is impossible to connect to the public instance from outside the VPC via any mechanism other than ssh. For example, try telnet, or bring up the redis-server and try to redis-cli to it.
Shutting everything down
AWS is very good at accruing charges, so you want to be especially sure you shut everything down properly. We'll be automating some of this in Clojure later, but for now, just use the web page:
- From the Instances page, TERMINATE the instances created from spot requests.
- STOP the NAT instance. Sometimes, this will give you a not-useful error about how this is an instance and therefore cannot be stopped. That seems to be related to the spot instances not being fully shut down, so try again every few seconds, pressing the mouse button harder each time.
- From the Spot Requests page, CANCEL all open requests. Sometimes, it takes a few seconds and a refresh after cancellation, before the state changes to "canceled". To teach Amazon a lesson, I recommend canceling over and over again during this period.
- From the Volumes page, filter for Detached Volumes, and delete them. This is super-duper, ultra important, because volumes accrue like dust bunnies, and can quickly come to dominate your monthly bill.
The Clojure Next Time
Next time, I'll introduce some basic tools in Clojure for managing the start-up and shutdown process, and actually get to the point of testing Girder.
Comments
comments powered by Disqus